If you are new to this blog, it probably would be to your benefit to start at the bottom post and work your way up. This blog is sponsored by weshoot.com, where you may see many examples of architectural photos, and bilbord.com, where you can see extensive retouching and enhancement of building images. Its purpose is to give anyone who wishes to photograph building interiors and exteriors the knowledge of how to do so correctly, and what to do in post-production work to make their images better and more professional-looking. I will periodically be adding to this blog. Please note that I do not allow blogspamming in comments, and any attempt to do so will wind up with the comment being removed.
Monday, September 19, 2005
Having Enough Information In Your Image:
To get a good image, you need enough information in the image file. Plan each image as though you were going to make the largest print you can from the image you are taking. If you are capturing the image digitally, my advice is to use the highest resolution you can when capturing the image. If you can take a large raw file, do so rather than taking a jpeg file. There is more color depth, and the file can be manipulated for robust color and less noise, etc. by working on it as a raw file first.
If you don't get enough information or pixels, the end result will be a degraded image. Don't try to get as many images on the compact flash or other cards as you can. Go for the fewest. If you need more room, get a bigger card, more cards, or download the images to a computer to free up space on the card. I see a lot of even little images in magazines that are pixelated. That means that I am seeing the little squares the image is made of, and that means the photographer did not have enough resolution. You can always make a smaller image from a large image file, but you will have a lot of trouble making a large image from a small image file.
To see what trying to make a large file from a smaller file looks like, see the comparison of Example 2 and Example 3 below:

Image Information:

If you have any images that look even remotely like example 3 (with visible "jaggies" in the diagonal lines like along the roof) you do not have enough information or pixels in the image. One warning on this: Due to differences of resolution on computer screens, "jaggies" may appear on any screen in certain sizes of jpeg image diagonals even if the image has enough pixels - but if the image prints with "jaggies," then there are not enough pixels for the size of the image. An example of this can be seen in Photoshop, when the image is seen at 12.5%, 25%, 50%, or 100%, there won't usually be "jaggies" in the image if there are enough pixels for the size. If you see the same image at other magnifications, such as 66.7% or 33.3%, you will probably see "jaggies" along diagonal lines.
Photoshop cannot make up for the fact that you don't have enough information to make a decent image! I use special resolution-enhancement software, and have enlarged a 32-megabyte image to 146 megs. You cannot, however, take a 500-kilobyte file and make a good 8 x 10 from it, using this software.
I have printed that 32" x 40" image I spoke of in a previous post at 200 pixels per inch, and was surprised at the quality. This was done on a wide inkjet printer. My printer says 150 pixels per inch will work quite well. Some experimentation would be needed to see if it could be printed photographically at the same resolution.
If you are getting the image on film, and plan to scan the image, the most information will come on larger pieces of film. I advise using a 4" x 5" camera, as I have indicated before. I have blown up 40" x 60" prints from this format, and they have been tack sharp without any visible grain.
Scanning film has a few caveats, however. It is almost impossible to clean the film of extraneous material. Little hairs, fuzz, dust, and film flaws all show up on the scan, and have to be touched out. I have spent hours cleaning up some film scans, with the average amount of time at around one hour. Another cute thing that happens (when using a flat bed scanner) is that if the film should touch the glass, look out for Newton Rings. These are multi-colored irregular rings, that look like tree rings, and have the coloring of oil on water, sort of rainbow colored. These are sometimes extremely hard to remove with editing programs.
To get a good image, you need enough information in the image file. Plan each image as though you were going to make the largest print you can from the image you are taking. If you are capturing the image digitally, my advice is to use the highest resolution you can when capturing the image. If you can take a large raw file, do so rather than taking a jpeg file. There is more color depth, and the file can be manipulated for robust color and less noise, etc. by working on it as a raw file first.
If you don't get enough information or pixels, the end result will be a degraded image. Don't try to get as many images on the compact flash or other cards as you can. Go for the fewest. If you need more room, get a bigger card, more cards, or download the images to a computer to free up space on the card. I see a lot of even little images in magazines that are pixelated. That means that I am seeing the little squares the image is made of, and that means the photographer did not have enough resolution. You can always make a smaller image from a large image file, but you will have a lot of trouble making a large image from a small image file.
To see what trying to make a large file from a smaller file looks like, see the comparison of Example 2 and Example 3 below:
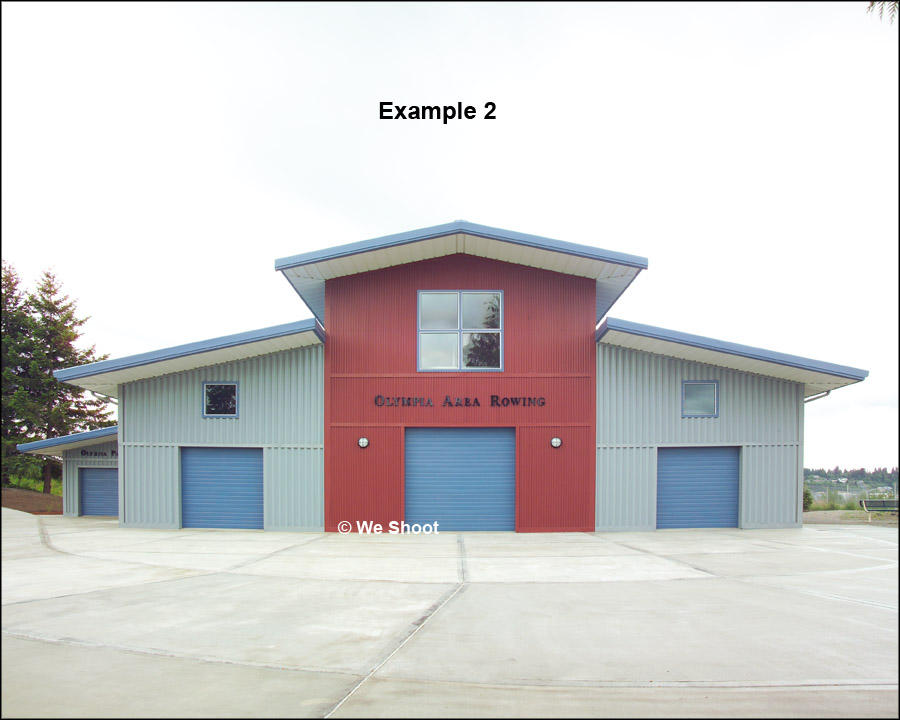
Image Information:
If you have any images that look even remotely like example 3 (with visible "jaggies" in the diagonal lines like along the roof) you do not have enough information or pixels in the image. One warning on this: Due to differences of resolution on computer screens, "jaggies" may appear on any screen in certain sizes of jpeg image diagonals even if the image has enough pixels - but if the image prints with "jaggies," then there are not enough pixels for the size of the image. An example of this can be seen in Photoshop, when the image is seen at 12.5%, 25%, 50%, or 100%, there won't usually be "jaggies" in the image if there are enough pixels for the size. If you see the same image at other magnifications, such as 66.7% or 33.3%, you will probably see "jaggies" along diagonal lines.
Photoshop cannot make up for the fact that you don't have enough information to make a decent image! I use special resolution-enhancement software, and have enlarged a 32-megabyte image to 146 megs. You cannot, however, take a 500-kilobyte file and make a good 8 x 10 from it, using this software.
I have printed that 32" x 40" image I spoke of in a previous post at 200 pixels per inch, and was surprised at the quality. This was done on a wide inkjet printer. My printer says 150 pixels per inch will work quite well. Some experimentation would be needed to see if it could be printed photographically at the same resolution.
If you are getting the image on film, and plan to scan the image, the most information will come on larger pieces of film. I advise using a 4" x 5" camera, as I have indicated before. I have blown up 40" x 60" prints from this format, and they have been tack sharp without any visible grain.
Scanning film has a few caveats, however. It is almost impossible to clean the film of extraneous material. Little hairs, fuzz, dust, and film flaws all show up on the scan, and have to be touched out. I have spent hours cleaning up some film scans, with the average amount of time at around one hour. Another cute thing that happens (when using a flat bed scanner) is that if the film should touch the glass, look out for Newton Rings. These are multi-colored irregular rings, that look like tree rings, and have the coloring of oil on water, sort of rainbow colored. These are sometimes extremely hard to remove with editing programs.
![]()