If you are new to this blog, it probably would be to your benefit to start at the bottom post and work your way up. This blog is sponsored by weshoot.com, where you may see many examples of architectural photos, and bilbord.com, where you can see extensive retouching and enhancement of building images. Its purpose is to give anyone who wishes to photograph building interiors and exteriors the knowledge of how to do so correctly, and what to do in post-production work to make their images better and more professional-looking. I will periodically be adding to this blog. Please note that I do not allow blogspamming in comments, and any attempt to do so will wind up with the comment being removed.
Sunday, September 18, 2005
Perspective control:
Let's talk about perspective control. After all, it's what mainly separates architectural photographers from just photographers. Anyone can take pictures of a building. Making the uprights straight, or limiting "keystoning" is the mark of the architectural photographer. There are various methods of straightening the uprights, and to some extent, the sideways converging of the top of the building to the baseline of the building. This holds true on interiors, as well. Wide-angle lenses tend to make doorways, cabinets, and closets, and other interior vertical uprights somewhat smaller at the top than on the bottom, or vice-versa. Doorways are reasonably straight, so making them look that way is imperative for the architectural photographer. Take a look at example 1 and example 2 below:
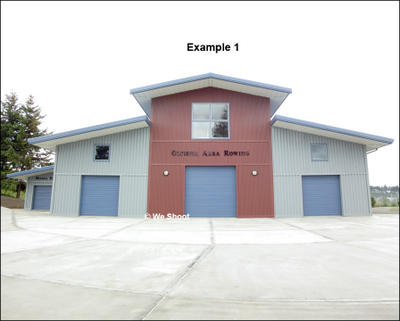
You will note that the appearance of the outer walls converging of example 1 is what you usually see in the images of buildings in newspaper editorial articles, taken by skilled photographers (but they are not usually architectural photographers). It makes the image look somewhat like the distortion in a fun-house mirror. Many realtors, builders, developers, etc. take images like this daily for marketing their buildings. They want to save money, so they don't want to spend on a photographer clicking a camera. When it comes to a bid against a similar competitor, they may be losing out with their amateur images against pro architectural images that may be used by their competitor. They may never know why, but if the walls don't look straight, are the walls actually straight? You may be putting a psychological block to your images in your client's mind.
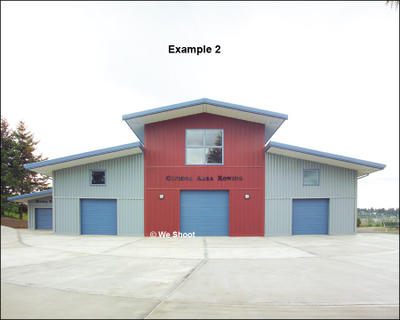
Now look at example 2. The walls are straight. Doesn't that look better than example 1? How exactly was that accomplished? There are several ways of accomplishing this:
Perspective control for many years was done in large-format cameras. Today, the 4X5 view camera is still pretty much the same functional design as those cameras from yesteryear. In this camera, the front of the camera, to which the lens is attached, and the back of the camera, where the film is inserted are able to be moved and manipulated independently of each other, and are attached to each other by a flexible, light-tight bellows unit. Being able to change the relationship of lens board to film plane allows one to straighten the appearance of the uprights tending to converge. Large-format cameras plus the wide-angle lenses for doing architectural photography can be quite pricey. Some models of this type of camera don't lend themselves too well to architectural photography, while others are better. We like the L-Standard camera ourselves, as the design allows loading the polaroid back even with the rear board tilted severely on a horizontal image. This could be a discussion for another day. Another thing to look for is that ultra-wide angle lenses, such as a 47mm need a recessed board and the ability for the front and back boards to be very close together to get the lens to focus on infinity. We had to get a new camera just to be able to use the 47mm lens. Other expenses for this camera are a short focusing rail and a bag bellows.
A cheaper but effective method is to use a shift or perspective-control (pc) lens on a fixed film plane camera, like a 35mm SLR. We use the Nikon 28mm pc lens. It allows lens movement in relation to the camera in one direction, be that up, down, or side-ways. It allows the photographer to get the uprights straight most of the time, but the lens is not very wide (by our standards) and won't get the larger buildings totally in the image.
Another cheap but effective method is to stand far enough back, if you can, and move the building to high on the image, if it will fit. This puts an awful lot of parking lot, street, or field in the image foreground, as well. If you made an 8 x 10 of the image, a one-story building (which was the subject of your photo) will be in the upper half to one-third of the image. Clients don't like this.
The last method is the one I am now employing. Using 19mm and 14mm lenses, I shoot the building nearer to the bottom of the image, giving more sky (more attractive than a lot of parking lot) tilting the camera upward. This will give the effect of example 1 above. I then take that image and straighten that in Adobe Photoshop to give us example 2. Adobe Photoshop currently costs around $600.00 for the stand-alone version (not an update), and doesn't do any of this automatically. It requires knowledge, skill, a learning curve, and a lot of time.
Let's talk about perspective control. After all, it's what mainly separates architectural photographers from just photographers. Anyone can take pictures of a building. Making the uprights straight, or limiting "keystoning" is the mark of the architectural photographer. There are various methods of straightening the uprights, and to some extent, the sideways converging of the top of the building to the baseline of the building. This holds true on interiors, as well. Wide-angle lenses tend to make doorways, cabinets, and closets, and other interior vertical uprights somewhat smaller at the top than on the bottom, or vice-versa. Doorways are reasonably straight, so making them look that way is imperative for the architectural photographer. Take a look at example 1 and example 2 below:
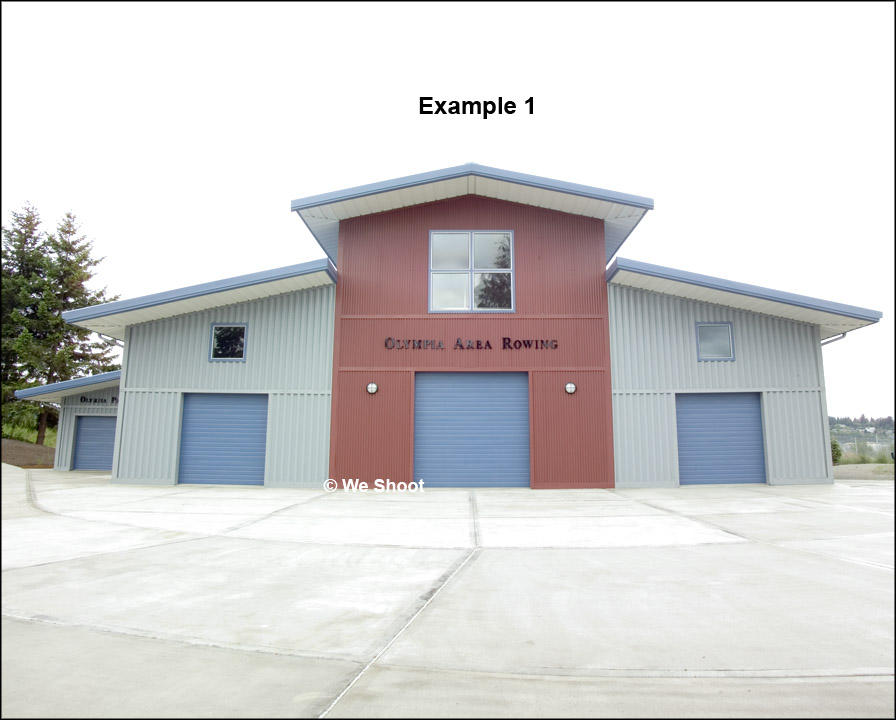

You will note that the appearance of the outer walls converging of example 1 is what you usually see in the images of buildings in newspaper editorial articles, taken by skilled photographers (but they are not usually architectural photographers). It makes the image look somewhat like the distortion in a fun-house mirror. Many realtors, builders, developers, etc. take images like this daily for marketing their buildings. They want to save money, so they don't want to spend on a photographer clicking a camera. When it comes to a bid against a similar competitor, they may be losing out with their amateur images against pro architectural images that may be used by their competitor. They may never know why, but if the walls don't look straight, are the walls actually straight? You may be putting a psychological block to your images in your client's mind.
Now look at example 2. The walls are straight. Doesn't that look better than example 1? How exactly was that accomplished? There are several ways of accomplishing this:
Perspective control for many years was done in large-format cameras. Today, the 4X5 view camera is still pretty much the same functional design as those cameras from yesteryear. In this camera, the front of the camera, to which the lens is attached, and the back of the camera, where the film is inserted are able to be moved and manipulated independently of each other, and are attached to each other by a flexible, light-tight bellows unit. Being able to change the relationship of lens board to film plane allows one to straighten the appearance of the uprights tending to converge. Large-format cameras plus the wide-angle lenses for doing architectural photography can be quite pricey. Some models of this type of camera don't lend themselves too well to architectural photography, while others are better. We like the L-Standard camera ourselves, as the design allows loading the polaroid back even with the rear board tilted severely on a horizontal image. This could be a discussion for another day. Another thing to look for is that ultra-wide angle lenses, such as a 47mm need a recessed board and the ability for the front and back boards to be very close together to get the lens to focus on infinity. We had to get a new camera just to be able to use the 47mm lens. Other expenses for this camera are a short focusing rail and a bag bellows.
A cheaper but effective method is to use a shift or perspective-control (pc) lens on a fixed film plane camera, like a 35mm SLR. We use the Nikon 28mm pc lens. It allows lens movement in relation to the camera in one direction, be that up, down, or side-ways. It allows the photographer to get the uprights straight most of the time, but the lens is not very wide (by our standards) and won't get the larger buildings totally in the image.
Another cheap but effective method is to stand far enough back, if you can, and move the building to high on the image, if it will fit. This puts an awful lot of parking lot, street, or field in the image foreground, as well. If you made an 8 x 10 of the image, a one-story building (which was the subject of your photo) will be in the upper half to one-third of the image. Clients don't like this.
The last method is the one I am now employing. Using 19mm and 14mm lenses, I shoot the building nearer to the bottom of the image, giving more sky (more attractive than a lot of parking lot) tilting the camera upward. This will give the effect of example 1 above. I then take that image and straighten that in Adobe Photoshop to give us example 2. Adobe Photoshop currently costs around $600.00 for the stand-alone version (not an update), and doesn't do any of this automatically. It requires knowledge, skill, a learning curve, and a lot of time.
![]()