If you are new to this blog, it probably would be to your benefit to start at the bottom post and work your way up. This blog is sponsored by weshoot.com, where you may see many examples of architectural photos, and bilbord.com, where you can see extensive retouching and enhancement of building images. Its purpose is to give anyone who wishes to photograph building interiors and exteriors the knowledge of how to do so correctly, and what to do in post-production work to make their images better and more professional-looking. I will periodically be adding to this blog. Please note that I do not allow blogspamming in comments, and any attempt to do so will wind up with the comment being removed.
Thursday, September 22, 2005
The Double-Exposure:
Many years ago, while cutting our teeth on weddings, a double-exposure meant two exposures on the same piece of film. Sometimes mask filters were employed, like a dot and a circular hole. One clear filter had a black dot in some part of it, say, in the center. This was used while taking an image of the dancing at the reception (or other such scene) and would keep part of the film frame unexposed for the second part of the exposure. The camera had a means to keep the film from advancing while the shutter was cocked, and the first filter was replaced by another, this time with circular hole placed where the dot was on the first filter. An exposure was then taken of a close-up of the bride and groom, placing them as presiding over the scene behind them.
In architectural photography, a similar thing can be done in the digital age, whether shooting on film or capturing an image with a digital camera! The reason is a little different, though. If you have lots of money and a crew to assist you on an interior shoot, and are aiming towards the outside windows, you can use neutral-density filtration materials on the windows and cut down the amount of light entering the room from outside. This cuts the contrast between the darkness of the room and the brightness of the outside. This way, the scene outside, be it a garden or a pool area, are not blown out in the image. I will illustrate how to use two negatives to shoot the image and marry them in Photoshop. This can also be done with digital images. This is the poor-man's way to shoot such an image without a crew of grips, and spending money on much neutral-density material. This particular shot would have been hard to do with neutral-density sheeting, as the door to the room was open - no glass. See Examples 4, 5, and 6 below:
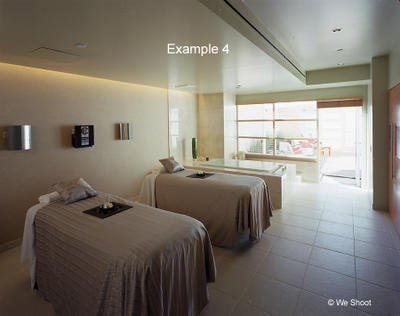
Example 4 shows the room, a 4x5 neg exposed to show enough detail in the room, while not changing the mood, which was supposed to be relaxing and soothing. We could have lit the room up to cut the contrast between inside and outside, but it would have ruined the mood. The outside is all but blown out.
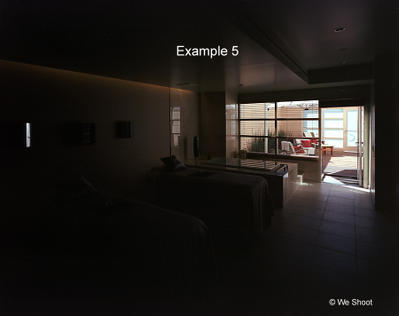
Prior planning is everything, and we brought extra film and Polaroids to handle a situation such as this. Example 5 (another 4x5 neg) shows the same image exposed for the light outside the room. This made the room dark and with not enough detail for a finished image. This part of the final image has to be shot at the same aperture as before, as the image will be bigger or smaller in size compared to the first, depending on the aperture. Only the exposure time is less on Example 5 than on Example 4.
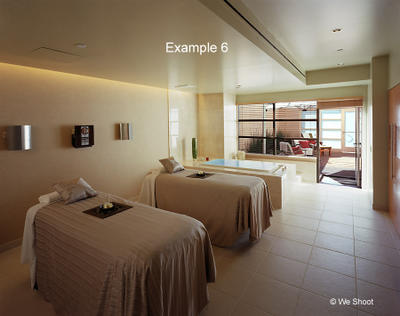
Example 6 shows the marriage of the two images, with a bit of a massage in Photoshop, blending the two images. Example 6 is a more pleasing image than Example 4, and closely mimics what we could see with our own eyes while we were in the room.
Plan for these images, and take the exposures necessary to ensure that you will be able to make the image you envisioned.
Many years ago, while cutting our teeth on weddings, a double-exposure meant two exposures on the same piece of film. Sometimes mask filters were employed, like a dot and a circular hole. One clear filter had a black dot in some part of it, say, in the center. This was used while taking an image of the dancing at the reception (or other such scene) and would keep part of the film frame unexposed for the second part of the exposure. The camera had a means to keep the film from advancing while the shutter was cocked, and the first filter was replaced by another, this time with circular hole placed where the dot was on the first filter. An exposure was then taken of a close-up of the bride and groom, placing them as presiding over the scene behind them.
In architectural photography, a similar thing can be done in the digital age, whether shooting on film or capturing an image with a digital camera! The reason is a little different, though. If you have lots of money and a crew to assist you on an interior shoot, and are aiming towards the outside windows, you can use neutral-density filtration materials on the windows and cut down the amount of light entering the room from outside. This cuts the contrast between the darkness of the room and the brightness of the outside. This way, the scene outside, be it a garden or a pool area, are not blown out in the image. I will illustrate how to use two negatives to shoot the image and marry them in Photoshop. This can also be done with digital images. This is the poor-man's way to shoot such an image without a crew of grips, and spending money on much neutral-density material. This particular shot would have been hard to do with neutral-density sheeting, as the door to the room was open - no glass. See Examples 4, 5, and 6 below:


Example 4 shows the room, a 4x5 neg exposed to show enough detail in the room, while not changing the mood, which was supposed to be relaxing and soothing. We could have lit the room up to cut the contrast between inside and outside, but it would have ruined the mood. The outside is all but blown out.
Prior planning is everything, and we brought extra film and Polaroids to handle a situation such as this. Example 5 (another 4x5 neg) shows the same image exposed for the light outside the room. This made the room dark and with not enough detail for a finished image. This part of the final image has to be shot at the same aperture as before, as the image will be bigger or smaller in size compared to the first, depending on the aperture. Only the exposure time is less on Example 5 than on Example 4.
Example 6 shows the marriage of the two images, with a bit of a massage in Photoshop, blending the two images. Example 6 is a more pleasing image than Example 4, and closely mimics what we could see with our own eyes while we were in the room.
Plan for these images, and take the exposures necessary to ensure that you will be able to make the image you envisioned.
Monday, September 19, 2005
Having Enough Information In Your Image:
To get a good image, you need enough information in the image file. Plan each image as though you were going to make the largest print you can from the image you are taking. If you are capturing the image digitally, my advice is to use the highest resolution you can when capturing the image. If you can take a large raw file, do so rather than taking a jpeg file. There is more color depth, and the file can be manipulated for robust color and less noise, etc. by working on it as a raw file first.
If you don't get enough information or pixels, the end result will be a degraded image. Don't try to get as many images on the compact flash or other cards as you can. Go for the fewest. If you need more room, get a bigger card, more cards, or download the images to a computer to free up space on the card. I see a lot of even little images in magazines that are pixelated. That means that I am seeing the little squares the image is made of, and that means the photographer did not have enough resolution. You can always make a smaller image from a large image file, but you will have a lot of trouble making a large image from a small image file.
To see what trying to make a large file from a smaller file looks like, see the comparison of Example 2 and Example 3 below:

Image Information:

If you have any images that look even remotely like example 3 (with visible "jaggies" in the diagonal lines like along the roof) you do not have enough information or pixels in the image. One warning on this: Due to differences of resolution on computer screens, "jaggies" may appear on any screen in certain sizes of jpeg image diagonals even if the image has enough pixels - but if the image prints with "jaggies," then there are not enough pixels for the size of the image. An example of this can be seen in Photoshop, when the image is seen at 12.5%, 25%, 50%, or 100%, there won't usually be "jaggies" in the image if there are enough pixels for the size. If you see the same image at other magnifications, such as 66.7% or 33.3%, you will probably see "jaggies" along diagonal lines.
Photoshop cannot make up for the fact that you don't have enough information to make a decent image! I use special resolution-enhancement software, and have enlarged a 32-megabyte image to 146 megs. You cannot, however, take a 500-kilobyte file and make a good 8 x 10 from it, using this software.
I have printed that 32" x 40" image I spoke of in a previous post at 200 pixels per inch, and was surprised at the quality. This was done on a wide inkjet printer. My printer says 150 pixels per inch will work quite well. Some experimentation would be needed to see if it could be printed photographically at the same resolution.
If you are getting the image on film, and plan to scan the image, the most information will come on larger pieces of film. I advise using a 4" x 5" camera, as I have indicated before. I have blown up 40" x 60" prints from this format, and they have been tack sharp without any visible grain.
Scanning film has a few caveats, however. It is almost impossible to clean the film of extraneous material. Little hairs, fuzz, dust, and film flaws all show up on the scan, and have to be touched out. I have spent hours cleaning up some film scans, with the average amount of time at around one hour. Another cute thing that happens (when using a flat bed scanner) is that if the film should touch the glass, look out for Newton Rings. These are multi-colored irregular rings, that look like tree rings, and have the coloring of oil on water, sort of rainbow colored. These are sometimes extremely hard to remove with editing programs.
To get a good image, you need enough information in the image file. Plan each image as though you were going to make the largest print you can from the image you are taking. If you are capturing the image digitally, my advice is to use the highest resolution you can when capturing the image. If you can take a large raw file, do so rather than taking a jpeg file. There is more color depth, and the file can be manipulated for robust color and less noise, etc. by working on it as a raw file first.
If you don't get enough information or pixels, the end result will be a degraded image. Don't try to get as many images on the compact flash or other cards as you can. Go for the fewest. If you need more room, get a bigger card, more cards, or download the images to a computer to free up space on the card. I see a lot of even little images in magazines that are pixelated. That means that I am seeing the little squares the image is made of, and that means the photographer did not have enough resolution. You can always make a smaller image from a large image file, but you will have a lot of trouble making a large image from a small image file.
To see what trying to make a large file from a smaller file looks like, see the comparison of Example 2 and Example 3 below:
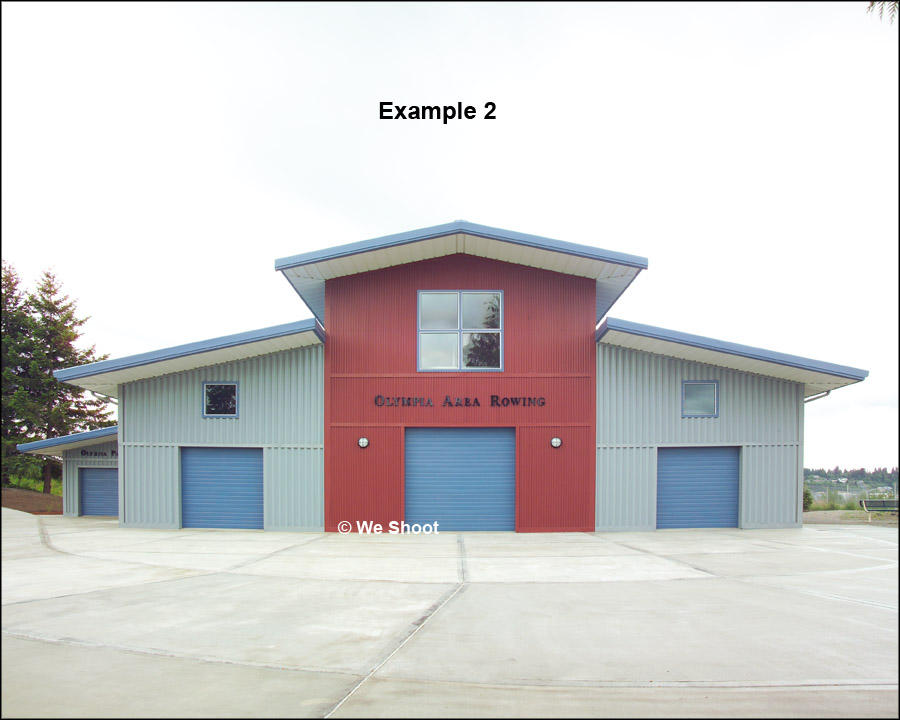
Image Information:
If you have any images that look even remotely like example 3 (with visible "jaggies" in the diagonal lines like along the roof) you do not have enough information or pixels in the image. One warning on this: Due to differences of resolution on computer screens, "jaggies" may appear on any screen in certain sizes of jpeg image diagonals even if the image has enough pixels - but if the image prints with "jaggies," then there are not enough pixels for the size of the image. An example of this can be seen in Photoshop, when the image is seen at 12.5%, 25%, 50%, or 100%, there won't usually be "jaggies" in the image if there are enough pixels for the size. If you see the same image at other magnifications, such as 66.7% or 33.3%, you will probably see "jaggies" along diagonal lines.
Photoshop cannot make up for the fact that you don't have enough information to make a decent image! I use special resolution-enhancement software, and have enlarged a 32-megabyte image to 146 megs. You cannot, however, take a 500-kilobyte file and make a good 8 x 10 from it, using this software.
I have printed that 32" x 40" image I spoke of in a previous post at 200 pixels per inch, and was surprised at the quality. This was done on a wide inkjet printer. My printer says 150 pixels per inch will work quite well. Some experimentation would be needed to see if it could be printed photographically at the same resolution.
If you are getting the image on film, and plan to scan the image, the most information will come on larger pieces of film. I advise using a 4" x 5" camera, as I have indicated before. I have blown up 40" x 60" prints from this format, and they have been tack sharp without any visible grain.
Scanning film has a few caveats, however. It is almost impossible to clean the film of extraneous material. Little hairs, fuzz, dust, and film flaws all show up on the scan, and have to be touched out. I have spent hours cleaning up some film scans, with the average amount of time at around one hour. Another cute thing that happens (when using a flat bed scanner) is that if the film should touch the glass, look out for Newton Rings. These are multi-colored irregular rings, that look like tree rings, and have the coloring of oil on water, sort of rainbow colored. These are sometimes extremely hard to remove with editing programs.
Sunday, September 18, 2005
Perspective control:
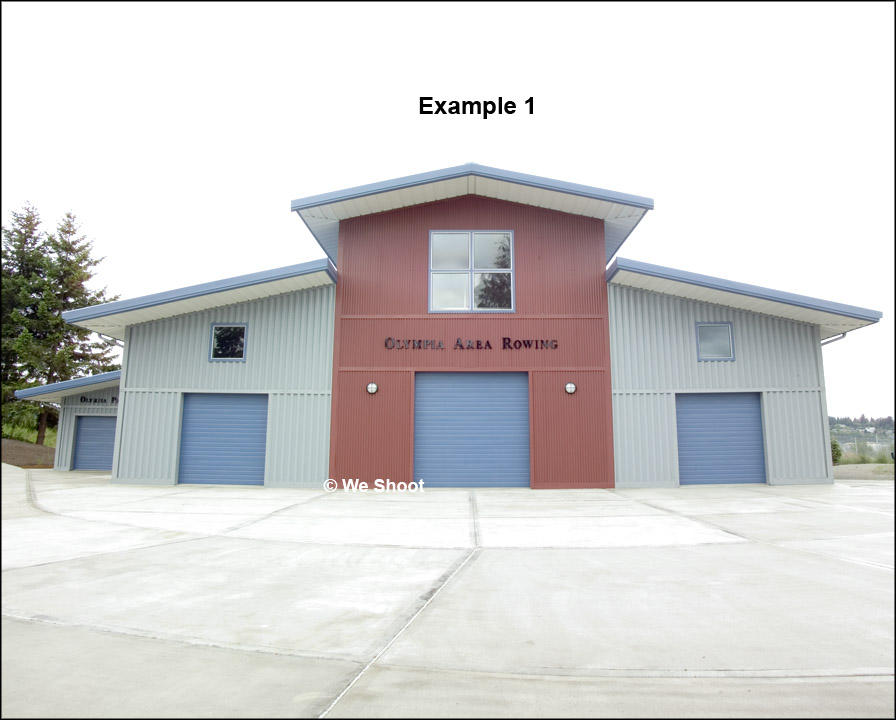
Let's talk about perspective control. After all, it's what mainly separates architectural photographers from just photographers. Anyone can take pictures of a building. Making the uprights straight, or limiting "keystoning" is the mark of the architectural photographer. There are various methods of straightening the uprights, and to some extent, the sideways converging of the top of the building to the baseline of the building. This holds true on interiors, as well. Wide-angle lenses tend to make doorways, cabinets, and closets, and other interior vertical uprights somewhat smaller at the top than on the bottom, or vice-versa. Doorways are reasonably straight, so making them look that way is imperative for the architectural photographer. Take a look at example 1 and example 2 below:
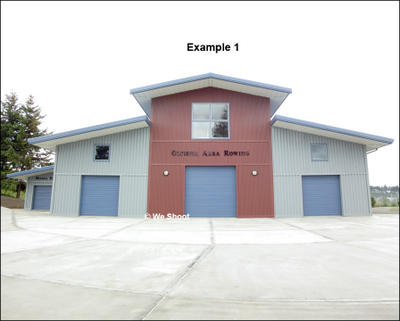

You will note that the appearance of the outer walls converging of example 1 is what you usually see in the images of buildings in newspaper editorial articles, taken by skilled photographers (but they are not usually architectural photographers). It makes the image look somewhat like the distortion in a fun-house mirror. Many realtors, builders, developers, etc. take images like this daily for marketing their buildings. They want to save money, so they don't want to spend on a photographer clicking a camera. When it comes to a bid against a similar competitor, they may be losing out with their amateur images against pro architectural images that may be used by their competitor. They may never know why, but if the walls don't look straight, are the walls actually straight? You may be putting a psychological block to your images in your client's mind.
Now look at example 2. The walls are straight. Doesn't that look better than example 1? How exactly was that accomplished? There are several ways of accomplishing this:
Perspective control for many years was done in large-format cameras. Today, the 4X5 view camera is still pretty much the same functional design as those cameras from yesteryear. In this camera, the front of the camera, to which the lens is attached, and the back of the camera, where the film is inserted are able to be moved and manipulated independently of each other, and are attached to each other by a flexible, light-tight bellows unit. Being able to change the relationship of lens board to film plane allows one to straighten the appearance of the uprights tending to converge. Large-format cameras plus the wide-angle lenses for doing architectural photography can be quite pricey. Some models of this type of camera don't lend themselves too well to architectural photography, while others are better. We like the L-Standard camera ourselves, as the design allows loading the polaroid back even with the rear board tilted severely on a horizontal image. This could be a discussion for another day. Another thing to look for is that ultra-wide angle lenses, such as a 47mm need a recessed board and the ability for the front and back boards to be very close together to get the lens to focus on infinity. We had to get a new camera just to be able to use the 47mm lens. Other expenses for this camera are a short focusing rail and a bag bellows.
A cheaper but effective method is to use a shift or perspective-control (pc) lens on a fixed film plane camera, like a 35mm SLR. We use the Nikon 28mm pc lens. It allows lens movement in relation to the camera in one direction, be that up, down, or side-ways. It allows the photographer to get the uprights straight most of the time, but the lens is not very wide (by our standards) and won't get the larger buildings totally in the image.
Another cheap but effective method is to stand far enough back, if you can, and move the building to high on the image, if it will fit. This puts an awful lot of parking lot, street, or field in the image foreground, as well. If you made an 8 x 10 of the image, a one-story building (which was the subject of your photo) will be in the upper half to one-third of the image. Clients don't like this.
The last method is the one I am now employing. Using 19mm and 14mm lenses, I shoot the building nearer to the bottom of the image, giving more sky (more attractive than a lot of parking lot) tilting the camera upward. This will give the effect of example 1 above. I then take that image and straighten that in Adobe Photoshop to give us example 2. Adobe Photoshop currently costs around $600.00 for the stand-alone version (not an update), and doesn't do any of this automatically. It requires knowledge, skill, a learning curve, and a lot of time.
Let's talk about perspective control. After all, it's what mainly separates architectural photographers from just photographers. Anyone can take pictures of a building. Making the uprights straight, or limiting "keystoning" is the mark of the architectural photographer. There are various methods of straightening the uprights, and to some extent, the sideways converging of the top of the building to the baseline of the building. This holds true on interiors, as well. Wide-angle lenses tend to make doorways, cabinets, and closets, and other interior vertical uprights somewhat smaller at the top than on the bottom, or vice-versa. Doorways are reasonably straight, so making them look that way is imperative for the architectural photographer. Take a look at example 1 and example 2 below:

You will note that the appearance of the outer walls converging of example 1 is what you usually see in the images of buildings in newspaper editorial articles, taken by skilled photographers (but they are not usually architectural photographers). It makes the image look somewhat like the distortion in a fun-house mirror. Many realtors, builders, developers, etc. take images like this daily for marketing their buildings. They want to save money, so they don't want to spend on a photographer clicking a camera. When it comes to a bid against a similar competitor, they may be losing out with their amateur images against pro architectural images that may be used by their competitor. They may never know why, but if the walls don't look straight, are the walls actually straight? You may be putting a psychological block to your images in your client's mind.
Now look at example 2. The walls are straight. Doesn't that look better than example 1? How exactly was that accomplished? There are several ways of accomplishing this:
Perspective control for many years was done in large-format cameras. Today, the 4X5 view camera is still pretty much the same functional design as those cameras from yesteryear. In this camera, the front of the camera, to which the lens is attached, and the back of the camera, where the film is inserted are able to be moved and manipulated independently of each other, and are attached to each other by a flexible, light-tight bellows unit. Being able to change the relationship of lens board to film plane allows one to straighten the appearance of the uprights tending to converge. Large-format cameras plus the wide-angle lenses for doing architectural photography can be quite pricey. Some models of this type of camera don't lend themselves too well to architectural photography, while others are better. We like the L-Standard camera ourselves, as the design allows loading the polaroid back even with the rear board tilted severely on a horizontal image. This could be a discussion for another day. Another thing to look for is that ultra-wide angle lenses, such as a 47mm need a recessed board and the ability for the front and back boards to be very close together to get the lens to focus on infinity. We had to get a new camera just to be able to use the 47mm lens. Other expenses for this camera are a short focusing rail and a bag bellows.
A cheaper but effective method is to use a shift or perspective-control (pc) lens on a fixed film plane camera, like a 35mm SLR. We use the Nikon 28mm pc lens. It allows lens movement in relation to the camera in one direction, be that up, down, or side-ways. It allows the photographer to get the uprights straight most of the time, but the lens is not very wide (by our standards) and won't get the larger buildings totally in the image.
Another cheap but effective method is to stand far enough back, if you can, and move the building to high on the image, if it will fit. This puts an awful lot of parking lot, street, or field in the image foreground, as well. If you made an 8 x 10 of the image, a one-story building (which was the subject of your photo) will be in the upper half to one-third of the image. Clients don't like this.
The last method is the one I am now employing. Using 19mm and 14mm lenses, I shoot the building nearer to the bottom of the image, giving more sky (more attractive than a lot of parking lot) tilting the camera upward. This will give the effect of example 1 above. I then take that image and straighten that in Adobe Photoshop to give us example 2. Adobe Photoshop currently costs around $600.00 for the stand-alone version (not an update), and doesn't do any of this automatically. It requires knowledge, skill, a learning curve, and a lot of time.
Saturday, September 17, 2005
Basics
Let's start with film:
Let's face it, film is on its way out as our photographic medium. While we still personally have our film equipment, digital is our new means of capturing images. Still, there will be
purists and diehards among photographers who feel film is the best medium. Let's look at the realities. For many years we lived and worked in Los Angeles, and the
surrounding area. We had many sources for film and processing. We used to shoot mostly transparencies (Fuji Provia and Velvia), but then we discovered Fuji negative film, NPS and NPL. These films had an extra color layer which eliminated the need to shoot with color-correcting filters in mixed lighting situations, especially indoors. A negative has about two more f-stops latitude than transparency film does, giving your images more detail in shadow and highlight areas on the film. Negatives seem to be more flexible toward overexposure, so we would shoot 160 ASA film at 100. This would open up the shadow areas and provide more detail in the shadows. Negatives do not like underexposure, however, and appear blue and cloudy in
underexposed areas.
One day we discovered that most of the exclusively E6 labs (processing for transparencies) had all but disappeared. Then, a lot of the other professional film labs had also died
or switched to digital output. That means that to make a print from film, the film has to be first scanned and the digitized version is then made into a photographic print.
Since most of our customers want digital images on CD or DVD, it is kind of backward to shoot with film and change it to digital images, unless there is some reason to warrant the extra time and expense in capturing the images on film first. We are doing more and more digital capture these days. It is true that there are still some things that digital lacks. Long exposures don't always work well with digital, as it introduces digital noise in the image. Digital noise is when a shadow area of the image gets pixels of green, red, and blue, or variations of those colors mixed in with the low detail. Another problem is moire patterns, but that is a point for another posting.
Acceptable camera formats: Film.
35mm is the smallest camera format that should be considered for real architectural photography. There are super-wide-angle lenses available for this format. There are also perspective-control (PC) lenses available. I will comment on Nikon, since that is my weapon of choice in this size. The PC lens we have is the wider 28mm version. It is really a shift lens, and will allow the user to get his building uprights straight. I find that 28mm is not wide enough to completely get a large building in a tip-to-tip, three cornered photograph. I prefer lenses in the 14mm to 19mm range. The 28mm Nikon PC lens can definitely take in smaller structures, without having to put too much of the foreground in a photograph. Clients don't like to see too much of the parking lot or a field in front of their building. Super wide-angle lenses help to eliminate that.
35mm is too small a format to get large prints from the film. You will start to see grain in anything larger than a 16 X 20 print, even with fine-grain film. Scanning the film at more than 90 megabytes is a waste as you will start to see the grain at 100% magnification.
2¼" format is better grainwise for large prints, but the cameras and lenses are outrageously expensive, and there isn't the selection of super wide-angle lenses available that there is in 35mm or 4X5.
We still have our trusty 4X5 camera and 4 lenses: a 210mm lens for detail or distance shooting, a 90mm wide-angle, a very wide 65mm, and the awesome, ultra-wide 47mm lens. The 47mm is the widest lens available in 4X5 that is meant to cover a 4X5 piece of film. Careful work must be done with it, as distortion, and vignetting can become a problem. We have shot 750,000 square-foot warehouses, complete, from tip-to-tip, from inside the parking lot with this lens.
Acceptable Camera Formats: Digital.
For super wide-angle work, you will need a full-frame digital 35mm sized camera. The current crop of "prosumer" digital SLR digital cameras, the fixed lens wide angle cameras, the 2¼" medium format cameras with digital backs, and the 4X5 with a digital back won't cut it! The prosumer camera (the D70 Nikon, the Canon EOS 20D, etc.) won't cut it for extreme wide angle shots. Each of these cameras has a magnification factor (or ratio) with 35mm lenses of around 1.5:1. That means that the Nikon D70 with the 14mm lens really sees the field in front of it as an equivalent 21mm lens. Now, you may think, "big deal, what's so great about 7mm shorter focal length?" Quite a difference. If you are backed up against the fence in the parking lot, and you can't quite get the building in, you would be able to with the extra angle of view with the same lens on the Kodak DCS camera (or with the Canon full-frame unit). We use the Kodak DCS 14n camera, and it gets us those shots others can't take. It is also 14-megapixels powerful. To date, I have made a super-crisp 32"X40" print from it. You won't be able to accomplish that with the Nikon D70, incredible camera that it is. I know, I have one of those, too.
![]()